
Titanic relic
Simple bead weaving and stringing techniques recall the elegance of another eraby Nealay Patel materials • 5g seed beads, size 110, hex cut main color (MC) • 1g seed beads, size 110, (MC) • 1g seed beads, size 110, accent color (AC) • 1g seed beads, size 60, (AC) • Nymo D, conditioned with Thread Heaven, color to match beads • 2 3-hole spacer bars • 2 bead tips • 2 soldered jump rings • 3-in. (76mm) small link chain • 6mm heart or crystal • S-hook or lobster claw clasp • 3mm crystal • head pin • tape Tools: chainnose pliers, wire cutters stepbystep Make this simple but lovely necklace with three medallions joined by seed bead strands. The beaded portion of the necklace measures 12 in. (.3m). The clasp and chain add another 31⁄2 in. (89mm) to the finished length. medallions
- 1) Start with 24 in. (.6m) of conditioned Nymo and leave a5-in. (.13m) tail. String a main color (MC) 110 seed bead, a 60 seed, 2MC, an accent color (AC)110, 2MC, and a 60. Sew through the first bead strung in the opposite direction as before (photo a). 2) String 1MC, a 60, 2MC, 1AC, and 2MC. Go through the last 60 strung in step 1 (photo b). Then go through the first MC strung in this step (photo c). Repeat three more times for a total of five loops (photo d).
- 3) Sew through the first AC and 60 strung in step 1. String 2MC, an AC, and 2MC. Go through the last 60 and MC strung in step 2 (photo e) to create the top of the sixth loop. Tie the tail and working thread in a surgeon’s knot (see “Basics”). Weave it through several beads, tie a half-hitch knot (see “Basics”), dot it with glue, and then trim the tail close to the beads.
- 4) Go back through the first MC and 60 strung in step 1 (photo f). Moving clockwise, continue through 2MC andthe AC at the top of the loop.
- 5) String 2MC, a 60, and 2MC. Go through the AC at the top of the next loop (photo g). Repeat five times. Sew through the first AC exited in step 4 to complete the medallion. Weave the tail through several beads and tie a half hitch. Glue the knot, but do not cut off the thread.
- 6) Repeat steps 1-5 to make two more of the medallions. outer strands To string the necklace, use hex-cut 110 seed beads.
- 1) String an AC to the middle of 1 yd. (.9m) of conditioned thread. Go through it again in the same direction to make a stop bead (which will be removed later). Starting at figure 1, point a sew through the top right 60 of a medallion. Pull the thread through the 60 until the stop bead rests against it. String five hex-cut seeds and an AC, twice. Then string five hex.
- 2) Sew through a 60 on the edge of another medallion. Then go through two hex, an AC, and two hex (figure 1, b-c).
- 3) Go through the next 60. String ten hex and an AC (figure 2, a-b). Repeat this sequence seven times. To make a longer necklace, string more sets of beads. Be sure to add the same number of beads to all strands on both sides of the necklace.
- 4) Go through the top hole on one of the three-hole spacer bars. String six hex, a bead tip with the hook facing out, and a hex (photo h). Wrap the thread with tape to hold it temporarily.
5) To string the bottom strand, start at figure 3, a and repeat steps 1-4, but go through the bottom hole of the spacer. 6) To make the other side, remove the stop bead from the top strand. Attach a needle and weave to the top left 60 (figure 4, a-b). Repeat steps 1-5. central strand
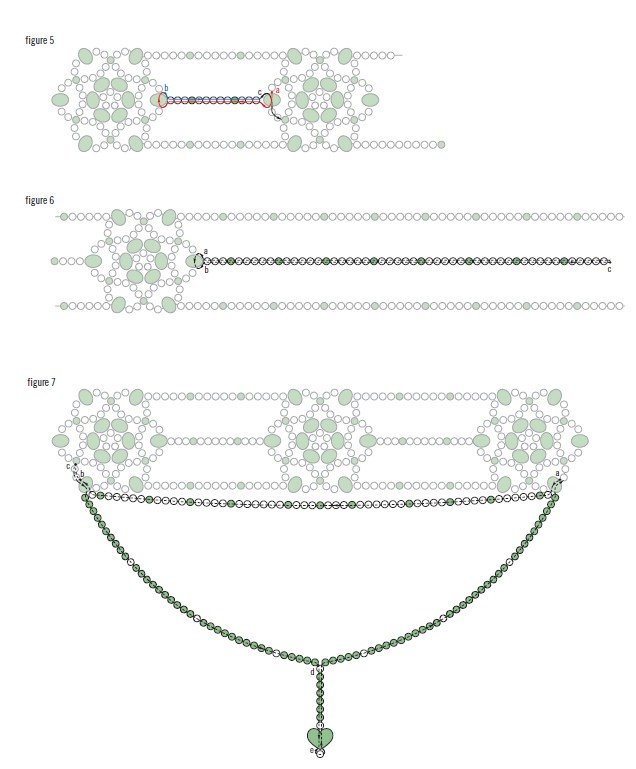
- 1) Using the thread tail remaining on the right medallion, weave over to figure 5, a. Go through the 60. String three hex, an AC, five hex, an AC, and three hex (a-b). Sew through the corresponding 60 on the center medallion.
- 2) Go through all the beads just strung. Start at point c and sew through the 60 and two hex. Weave the tail through several beads, knot, glue, and trim.
- 3) Start with 24 in. of conditioned thread and leave a 6-in. tail. String five hex and an AC. Repeat seven more times. End with three hex. Sew through the 60 on the right medallion (figure 6, a-b). Go back through the beads just strung (b-c).
- 4) Sew through the middle hole on the spacer. String five hex, and go through the bead tip. Wrap with tape.
- 5) Repeat steps 1-4 to complete the other end of the necklace.
swags Work the bottom two swags with a continuous thread.
- 1) String a stop bead 6-in. from the end of 24 in. of conditioned thread. Sew through the 60 (figure 7, a) and pull the thread through until the stop bead rests against the 60. String a hex, an AC, five hex, an AC, four hex, an AC, four hex, an AC, six hex, an AC, and three hex. String an AC, then reverse the sequence just strung. Go through the corresponding 60 on the opposite medallion (a-b).
- 2) Sew through two hex (b-c) and tie a half-hitch knot. Go back through the hex beads and exit the 60.
- 3) String 10AC and a hex. Repeat twice. Then string 6AC. To make the dangle, string a hex, 7AC, a hex, a 6mm heart, and 1AC (d-e). Skip the AC and sew back through the beads to point d. String the second side of the swag by reversing the sequence strung before the dangle. Sew through the 60 back to point a.
- 4) Remove the stop bead and tie the thread ends with a surgeon’s knot. Glue the knot. Weave each of the tails through several beads, then trim.
closure Use a seed bead inside each bead tip to secure the strands’ ends.
- 1) Carefully remove the tape from the strands at one end of the necklace. Arrange them so the five-bead strand sits inside the two six-bead strands (photo i). Slide an 110 bead over two of the threads (photo j). Use both sets of threads to tie two surgeon’s knots. Dot with glue. Trim the tails when dry.
- 2) Use chainnose pliers to close the bead tip (photo k). Slide a soldered jump ring and an S-hook or lobster claw clasp into the hook of the bead tip. Use chainnose pliers to close the hook.
- 4) Repeat on the other end of the necklace, sliding on a 3-in. (76mm) piece of chain instead of the clasp.
- 5) To make the dangle at the end of the chain, slide a hex, a 3mm crystal or bead, and a hex on a head pin. Begin a wrapped loop, (see “Basics”). Slide the end loop of chain into the wrapped loop and close the loop. Photo l shows the completed clasp.
Contact Nealay in care of Bead&Button.


Comments are closed.